
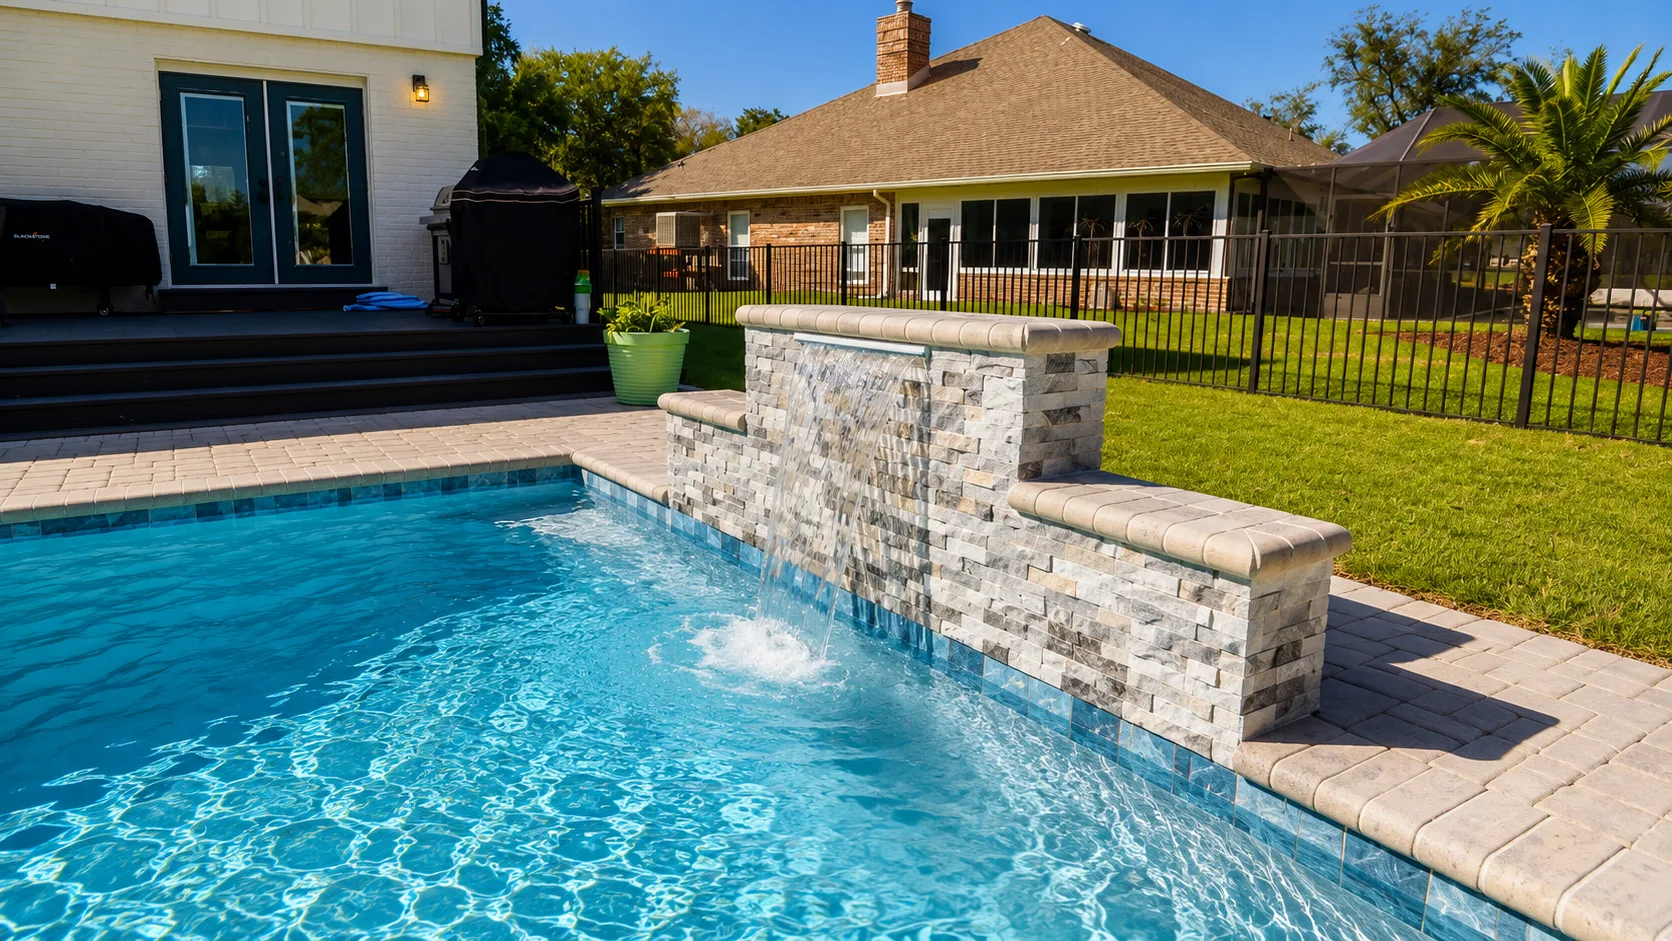
Why Your Pebblecrete Pool Surface Matters
Pebblecrete pool repairs are essential maintenance tasks that can save you thousands of dollars and extend the life of your pool’s beautiful aggregate finish. Whether you’re dealing with hairline cracks, rough patches, or missing pebbles, understanding how to address these issues quickly prevents small problems from becoming expensive full resurfacing projects.
Quick Answer: Common Pebblecrete Pool Repairs
- Hairline cracks: Seal with flexible pool sealants or marine-grade epoxy compounds
- Small patches: Cut out damaged area (¼ inch deep), apply repair mix with liquid bonder, expose aggregate
- Large delamination: May require professional assessment and full resurfacing ($8,000-$12,000)
- Typical lifespan: 15-20 years with proper maintenance
- Key maintenance: Maintain pH balance, brush regularly, keep pool filled
Pebblecrete—also called pebble aggregate or Pebble Tec—is one of the most durable pool finishes available. It consists of small pebbles embedded in reinforced concrete, creating a textured, natural-looking surface that typically lasts 15 to 20 years. The finish is achieved by acid washing or water-blasting the cured surface to expose the colorful aggregate underneath.
But here’s what many pool owners don’t realize: pool-grade pebblecrete is completely different from the material used for driveways or patios. Pool formulations include polymer additives and specially cleaned aggregates that resist acidic water and prevent impurities like iron from causing rust stains. Using the wrong product—or improper installation techniques—is one of the primary reasons pebblecrete surfaces fail prematurely.
The cement matrix holding those pebbles in place can wear down over time due to pool chemicals, ground movement, or simply age. When that happens, you’ll notice rough spots, cracks, or areas where the surface feels “hollow” or sounds drums when tapped. The good news? Many of these issues are repairable without the cost and disruption of a complete resurface.
I’m Lucas Pimenta, owner of Neway Pools serving Wilmington NC, Gulf Breeze FL, Cumming GA, and Huntsville AL, with over 20 years of experience building and maintaining custom gunite pools. Throughout my career, I’ve guided countless homeowners through pebblecrete pool repairs, helping them understand when a simple patch will do and when it’s time for professional intervention. Let’s walk through everything you need to know to keep your pool surface in top condition.
Is Your Pebblecrete Pool Crying for Help? Common Signs of Damage
Our pebblecrete pools are designed to be durable, but even the toughest surfaces show signs of wear and tear over time. Recognizing these indicators early is the first step in effective pebblecrete pool repairs. Ignoring them can lead to more extensive damage, turning a minor fix into a major overhaul.
Here are the common signs that your pebblecrete pool might be crying out for help:
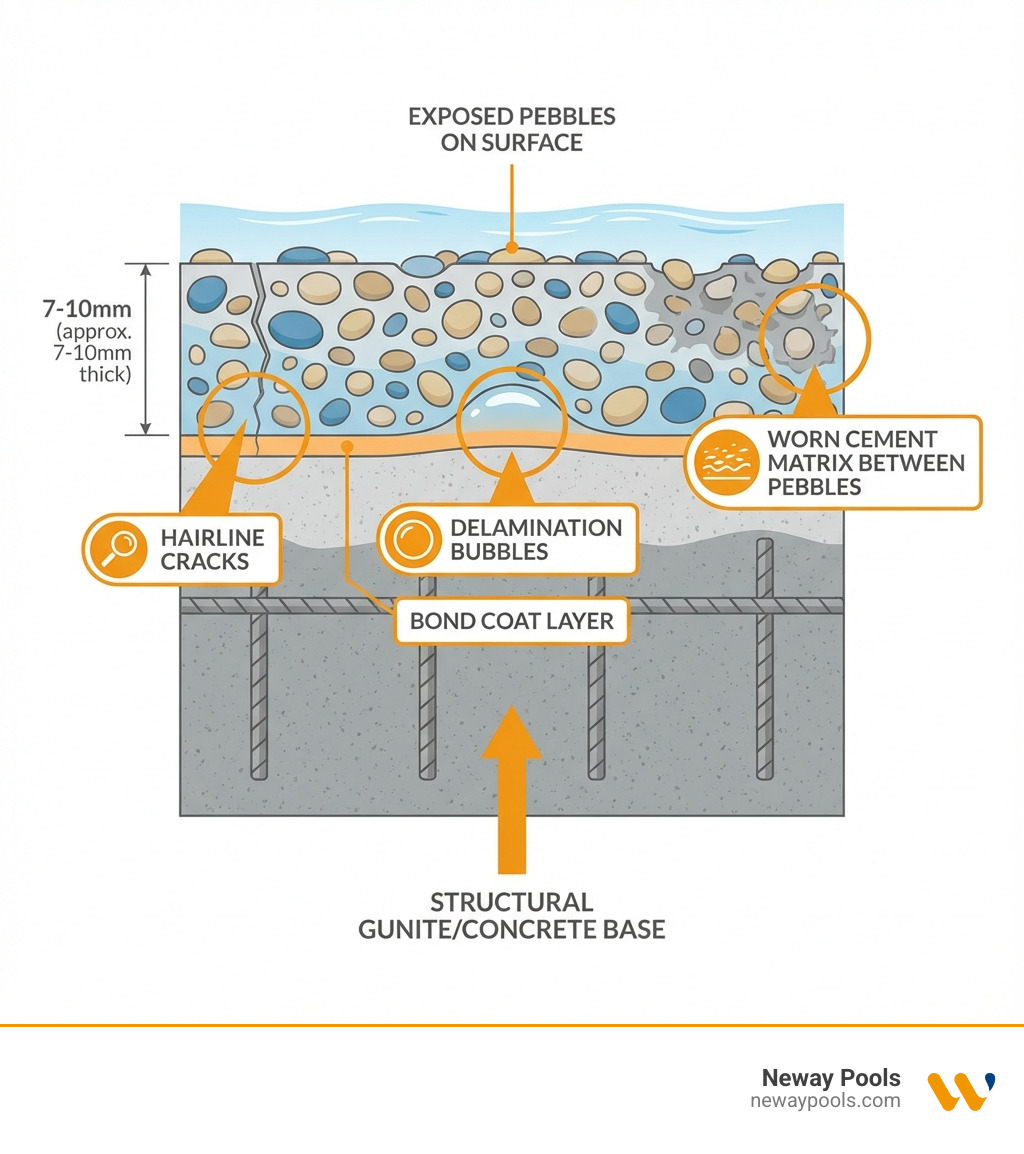
- Hairline Cracks: These small, superficial cracks are often nothing to worry about. They can occur due to rapid drying during application or minor stresses. Sometimes, they even seal themselves with calcium deposits. However, if you notice a large number of calcium deposits all over the floor of your pool, it could be a tell-tale sign that a resurface might be needed.
- Larger Structural Cracks: Unlike hairline cracks, larger cracks (especially those that extend deeper than the surface) can indicate underlying structural issues with the concrete shell. These are serious and require immediate professional assessment to prevent leaks and further damage.
- Staining and Discoloration: Persistent stains that don’t brush off can be caused by algae, metals in the water (like copper from algaecides or iron from salt), or an imbalance in water chemistry. While an acid wash can often make your pool look better by removing a fine layer of concrete and staining, it won’t rectify deeper issues like delamination.
- Rough Texture: Over time, the cement matrix that binds the pebbles can wear down due to pool chemicals, foot traffic, and general use. This exposes more of the aggregate, making the surface feel rough and potentially uncomfortable for swimmers. This wear can also create crevices where algae can grow.
- Missing Pebbles: If you find pebbles at the bottom of your pool or notice patches where the aggregate is sparse, it’s a clear sign that the binder is eroding and failing. This can lead to uneven surfaces and further deterioration.
- Delamination (Drumminess/Hollow Spots): This is a significant concern. Delamination looks like bubbles forming under the pebblecrete, where the surface pulls away from the concrete pool shell, allowing water to get in behind it. Any areas of delamination greater than 1 square meter are particularly concerning and will only worsen over time. Smaller areas can sometimes be patched, but widespread delamination usually points to a need for resurfacing.
- Calcium Deposits (Efflorescence): While sometimes a natural occurrence, large white or gray blobs of calcium that don’t brush off can indicate issues with water chemistry or even water seeping through cracks.
Understanding these signs helps us determine the appropriate course of action, from minor pebblecrete pool repairs to more extensive renovation.
More info about our concrete pools.
What Causes Pebblecrete to Crack and Fail?
To effectively address damage, we must first understand its root causes. Pebblecrete, though robust, isn’t immune to certain vulnerabilities:
- Improper Installation: This is a major culprit. If the pebblecrete layer was applied too thinly, especially over areas like stair edges, it becomes more prone to cracking. Rapid drying during hot application temperatures can cause hairline cracks to form. A “bony” mix—one with too many pebbles and insufficient concrete binder—results in a weak, brittle surface that deteriorates quickly. Trapped air bubbles during application can also lead to delamination as water seeps behind the surface over time.
- Poor Water Chemistry: Maintaining balanced pool water chemistry is paramount. If the pool water pH falls too low (becomes acidic) for an extended period, it becomes corrosive. This acidic water can eat away at the concrete binder holding the pebblecrete together, leading to worn patches, exposed aggregate, and cracks. Unbalanced water chemistry is one of the fastest ways to shorten the lifespan of any pool finish.
- Ground Movement: While pebblecrete is flexible to a degree, significant ground movement or settling of the pool’s foundation can cause stress fractures in the underlying concrete shell. These structural cracks will inevitably transfer through to the pebblecrete surface, requiring professional structural repairs in addition to surface patching.
- Age and Wear: Even with perfect maintenance, every pool finish has a lifespan. General wear and tear from chemicals, pool cleaners, and foot traffic will gradually degrade the surface over years of use. This is a natural process, but good maintenance can significantly extend that lifespan.
- Leaving the Pool Empty: This might seem counterintuitive, but leaving your pool empty for extended periods, particularly in areas like Florida, Georgia, North Carolina, and Alabama where we experience significant temperature fluctuations, can severely damage pebblecrete. The material can expand and contract with changes in temperature, causing it to crack and delaminate from the shell. It’s always best to keep your pool filled, even during the off-season.
By understanding these common causes, we can take proactive steps to prevent future damage and ensure our pebblecrete pool repairs are lasting solutions.
Your Step-by-Step Guide to Pebblecrete Pool Repairs
When it comes to pebblecrete pool repairs, many minor issues can be tackled with a little know-how and the right materials. We believe in empowering homeowners to handle small fixes, saving time and money. For larger issues, however, we always recommend professional intervention.
Before we dive in, let’s talk safety and preparation. Always wear appropriate safety gear, including rubber gloves and eye protection, when working with pool chemicals or repair compounds. You’ll generally need basic tools like a trowel, a sponge, and a bucket for mixing. The most critical material will be a high-quality pebblecrete repair kit, which typically includes a waterproof cement mix and a liquid cement bonder.
A challenge with patching pebblecrete is color matching. Due to sun fading and natural variations in aggregate batches, achieving a perfect match with existing surfaces can be tricky. Many DIY kits offer a range of colors, and some even allow for adjustment with titanium dioxide (to lighten) or black dye (to darken). Our best advice is to test a small, inconspicuous area first, mixing a small amount of dry material with water and comparing its wet color to your existing wet pool surface.
How to Fix Hairline Cracks
Hairline cracks are often the least intimidating of pebblecrete pool repairs. They’re typically superficial and don’t indicate major structural problems.
- Draining Water Level (if necessary): For cracks above the waterline, you won’t need to drain the pool. For underwater cracks, some flexible pool sealants or epoxy compounds can be applied underwater. Always check the product instructions carefully. If the product requires a dry surface, you’ll need to lower the water level below the crack.
- Cleaning the Crack: Use a stiff brush to clean any debris, algae, or calcium from within and around the crack. For underwater applications, a wire brush can be effective. Ensure the area is as clean as possible for optimal adhesion.
- Applying Sealant: For flexible solutions, we recommend using a marine-grade flexible pool sealant or an epoxy repair compound designed for underwater use. Carefully apply the product into the crack, ensuring it fills completely. Smooth the surface with a finger or small trowel.
- Curing Time: Allow the product to cure fully according to the manufacturer’s instructions before refilling the pool (if you drained it) or exposing it to heavy use.
While DIY kits can be effective for small hairline cracks, if a crack is particularly long or you’re unsure about its severity, it’s always best to contact a pool specialist for advice.
Contact us for advice on minor repairs.
The Process for Larger Pebblecrete Pool Repairs
Larger damaged areas, such as significant chips, small areas of delamination (less than 1 square meter), or patches of missing pebbles, require a more involved patching process.
- Draining the Pool: For these repairs, we recommend lowering the water level below the entire damaged area to ensure a dry surface for optimal adhesion.
- Chipping Out the Damaged Area: Using a hammer and chisel, carefully chip out all loose or delaminated pebblecrete. You want to create a clean, stable edge around the repair and chip the area down a minimum of ¼ inch deep. If you’re dealing with rust blowouts from rebar, you’ll need to cut out the rust and re-cement the base before patching the pebblecrete.
- Cleaning the Substrate: Thoroughly clean the exposed concrete substrate. Remove any dust, debris, or loose material. A wire brush and a rinse with fresh water (followed by drying) will help ensure a strong bond.
- Mixing the Patch Material: Follow the manufacturer’s instructions for your pebblecrete repair kit. Typically, you’ll mix the dry cement mix with a liquid cement bonder and water until it reaches a putty-like consistency. Remember to test the color if you’re unsure!
- Applying the Patch: Firmly trowel the mixed patch material into the prepared area. Ensure it completely fills the void and is compacted well against the existing substrate.
- Troweling Smooth: Smooth the surface of the patch, making it flush with the surrounding pebblecrete.
- Exposing the Aggregate: Once the patch material starts to cure (it will begin to firm up), gently spray it with water and use a soft sponge or trowel to carefully expose the pebbles, matching the texture of the surrounding surface. This is a delicate step to achieve a natural look.
- Curing Before Refilling: Most repair kits require a curing time of at least 12 hours before the pool can be refilled. Always adhere to the product’s specific guidelines to ensure the patch hardens properly and achieves maximum durability.
By following these steps, we can restore the integrity and appearance of your pebblecrete pool, preventing further damage and prolonging its life.
Patch Job vs. Full Makeover: When to Repair vs. Resurface
Deciding whether to perform a patch job or opt for a full resurfacing is a common dilemma for pool owners. It boils down to the extent of the damage, your budget, and your long-term goals for the pool.
| Criteria | Patching Pebblecrete | Full Resurfacing Pebblecrete |
|---|---|---|
| Cost | Relatively low cost; DIY kits are very affordable | High cost, typically $8,000-$12,000 |
| Time | Quick, often a few hours to a day | Significant, typically 1-2 weeks from start to finish |
| Longevity | Addresses symptom; lifespan depends on preparation and root cause; may not last as long as a full resurface | Provides a brand new surface; lasts 15-20+ years |
| Best For | Small hairline cracks, minor chips, small areas of missing pebbles, delamination < 1 sq meter | Widespread delamination, multiple large cracks, chalking/eroding surface, desire for new look, structural concerns |
As we’ve seen, standard white plaster finishes typically last between 5 to 10 years, while quartz aggregate finishes can last 10 to 15 years. Pebblecrete and aggregate finishes like Pebble Tec are known for their longevity, often lasting 15 to 20 years, with some extending beyond that if applied correctly and maintained carefully. Fiberglass finishes, for comparison, can last up to 30 years.
A patch job is a fantastic, cost-effective solution for isolated issues. It’s like putting a band-aid on a small cut—it’s effective for minor wounds. However, if your pool has widespread issues, a patch job might be more like trying to fix a leaky boat with chewing gum. When the damage is extensive, a full resurfacing becomes the more practical and ultimately more cost-effective solution in the long run.
When in doubt, especially with larger cracks or widespread issues, it’s always wise to call a professional. We can assess the underlying cause of the damage and recommend the most appropriate and durable solution for your pool.
Explore our pool remodeling services.
Deciding if a Full Resurface is More Cost-Effective
While the initial sticker shock of a full resurface might be daunting (the cost of pebblecrete resurfacing can range from $8,000 to $12,000), it can be the more financially prudent decision in several scenarios:
- Widespread Delamination (>1 sq meter): If you have multiple or large areas where the pebblecrete is delaminating from the shell, patching becomes a never-ending task. These areas will continue to grow and fail, making a full resurface the only lasting solution.
- Multiple Large Cracks: A single large crack might be repairable, but if your pool is riddled with multiple deep or extensive cracks, it suggests significant movement or stress in the concrete shell. Patching these individually is often a temporary fix, as new cracks may appear elsewhere. A full resurface, possibly combined with structural repairs, addresses the issue comprehensively.
- Chalking or Eroding Surface: If your pebblecrete surface feels consistently chalky or rough, and pebbles are easily dislodging across large areas, it indicates that the cement binder has significantly eroded. At this point, the integrity of the entire surface is compromised, and patching isolated spots won’t restore the overall quality or comfort of the pool.
- Desire for a New Look: Sometimes, your pebblecrete might still be functional, but you simply want to update your pool’s aesthetic. Resurfacing is the perfect opportunity to change the color, texture, or type of aggregate finish, giving your pool a completely refreshed and modern appearance.
- Structural Integrity Concerns: If you suspect your pool has underlying structural issues, such as significant leaks or shifting, a full resurface allows professionals to address these problems before applying a new finish. This ensures the longevity of both the repairs and the new surface.
A full resurface is an investment that provides a brand-new, durable surface, improves your pool’s beauty, and can significantly increase your property value. It’s often the best path when extensive damage or a desire for a fresh start outweighs the temporary benefits of repeated small repairs.
The Best Defense: Extending the Life of Your Pebblecrete Finish
Prevention is always better than cure, and this holds true for pebblecrete pool repairs. By adopting a few key maintenance practices, we can significantly extend the life of your pool’s finish and minimize the need for costly interventions.
The single most critical factor affecting the longevity and condition of your pebblecrete surface is water chemistry. Unbalanced water can wreak havoc on the cement binder that holds your pebbles in place.
- pH Balance: If your pool water’s pH falls too low (becomes acidic) for an extended period, it turns corrosive. This acidic water literally eats away at the concrete binder, leading to exposed aggregate, rough patches, and even cracks. We aim for a pH level between 7.4 and 7.6 to protect your pebblecrete.
- Alkalinity Levels: Total alkalinity acts as a buffer, helping to stabilize your pH. Keeping it within the recommended range (typically 80-120 ppm) prevents wild swings in pH that can harm your surface.
- Calcium Hardness: This is crucial. If your water’s calcium hardness is too low, the water will become “hungry” and start to leach calcium from your pool’s surface, accelerating the erosion of the cement binder. Maintaining calcium hardness between 200-400 ppm helps prevent this.
Beyond water chemistry, other practices are equally important:
- Regular Brushing and Cleaning: Brushing your pool walls and floor regularly prevents algae from taking hold and removes mineral deposits before they can stain or etch the surface. This also helps dislodge any loose debris that could cause abrasion.
- Avoiding Harsh Chemicals: While necessary for sanitization, overuse or improper application of harsh chemicals can accelerate the breakdown of your pebblecrete. Always dilute chemicals properly and add them slowly to the pool, away from the walls.
- Keeping the Pool Filled: As we discussed, leaving your pool empty for extended periods can cause the pebblecrete to expand and contract with temperature changes, leading to cracks and delamination. Always keep your pool filled, even during the off-season, to protect the surface.
By diligently following these maintenance guidelines, we ensure your pebblecrete pool remains beautiful, smooth, and crack-free for years to come.
View/Download General Information for PebbleCrete (PDF).
Frequently Asked Questions about Pebblecrete Pool Repairs
We often hear similar questions from homeowners tackling pebblecrete pool repairs.
Can you perfectly match the color of an old pebblecrete patch?
Achieving a perfect color match for an old pebblecrete patch is incredibly challenging, if not impossible. Here’s why:
- Sun Fading: Over years of exposure to UV rays and pool chemicals, your existing pebblecrete will have faded and changed hue. New patch material, even if the exact original color, will appear brighter and fresher.
- Batch Differences: Just like paint, different batches of pebblecrete aggregate and binder can have subtle variations.
- Pebble Size: Standard pebblecrete typically uses pebbles less than 3mm. If a repair uses larger pebbles (e.g., 4-6mm), the texture and appearance will be noticeably different.
We always recommend testing any repair material in a small, inconspicuous area first. Some repair kits allow for slight color adjustments with additives like titanium dioxide or black dye. For the best possible match, using samples of your original pebble (if available) can help guide the selection of repair materials. Professionals often have access to a wider range of aggregate types and binders, and their experience can lead to a more accurate blend, though “perfect” remains elusive. The goal is usually a blend that is as close as possible and not overtly noticeable.
How long does a pebblecrete patch last?
The longevity of a pebblecrete pool repair patch depends heavily on several factors:
- Preparation: A patch applied to a poorly cleaned or unstable surface will fail quickly. Proper cleaning, chipping out damaged material, and ensuring a solid substrate are crucial.
- Application: Correct mixing ratios, firm application, and proper curing (including exposing the aggregate at the right time) are essential for durability.
- Root Cause: If the patch is merely covering an underlying structural crack or widespread delamination, it may only last a short time before the underlying problem causes it to fail again. A patch addresses the symptom, not always the root cause.
- Maintenance: Ongoing good water chemistry and general pool maintenance will help any patch last longer.
A well-executed patch on a minor, superficial issue can last for many years, blending seamlessly with the existing surface. However, if the patch is a temporary fix for a larger problem, its lifespan may be limited.
Are DIY pebblecrete repairs effective?
DIY pebblecrete pool repairs can be quite effective, but only for specific types of damage.
- Effective for: Small, cosmetic issues like hairline cracks, minor chips, and very small (less than 1 square meter) areas of missing pebbles or delamination. Many easy-to-use pebblecrete repair kits are available and can be a cheaper alternative to a full resurface for these minor problems.
- Not a solution for: Large-scale delamination, extensive or deep structural cracks, or widespread erosion of the surface. These issues are complex and require professional expertise, specialized tools, and a comprehensive understanding of pool construction and finishes. If a crack is particularly long or deep, or if the damage covers a significant area, you absolutely need to contact a pool specialist.
- Best Results: To maximize the effectiveness of any DIY repair, always follow the product instructions carefully. Proper surface preparation, mixing, application, and curing are key.
For any repair beyond a minor cosmetic fix, we strongly recommend professional assessment. Our team serving Florida, Georgia, North Carolina, and Alabama can accurately diagnose the problem and provide a lasting solution, ensuring the integrity and beauty of your pool.
Restore Your Pool’s Beauty and Integrity
Our pool is more than just a place to swim; it’s a centerpiece of our outdoor living space, a source of relaxation, and a hub for family fun. Maintaining its beauty and integrity, especially its pebblecrete finish, is an investment in that enjoyment.
We’ve covered a lot today, from recognizing the subtle signs of damage to understanding the causes and the steps for effective pebblecrete pool repairs. The key takeaways are clear:
- Small patches are manageable DIY projects: For hairline cracks, minor chips, or small areas of missing pebbles, a DIY repair kit can be a cost-effective and efficient solution.
- Widespread damage requires professional assessment: When faced with large cracks, extensive delamination, or widespread surface erosion, it’s time to call in the experts. Attempting to DIY these issues can lead to more significant problems and higher costs down the line.
- Proper maintenance is key: Consistent water chemistry, regular cleaning, and keeping your pool filled are your best defenses against premature wear and tear.
At Neway Pools, we pride ourselves on designing and building custom gunite pools and outdoor living spaces in Florida, Georgia, North Carolina, and Alabama. Our expertise extends to ensuring your pool’s finish remains as beautiful and durable as the day it was installed. Whether you need advice on a minor repair or are considering a full pool remodeling to bring your vision to life, we’re here to help.
Don’t let cracked or worn pebblecrete diminish your pool experience.
Contact us today to discuss your pool remodeling project.
Explore Neway Pools, Gulf Breeze, Florida